Photo shoot designed by Lisa & Andy |
Sunday, August 7, 2011
Lasagna Cupcakes
So during a recent "mail call" (as my husband likes to call it- because of how infrequently we check our box) I read through a PEOPLE magazine. I found a recipe for Lasagna Cupcakes based on the one from Heirloom LA (who are AMAZING!). It's this recipe below that is originally for mac n' cheese lasagna cupcakes but I did a meat version. I browned meat and added some spaghetti sauce.
They were good. In my opinion, the green beans were better (they will change your life)! For next time, I will add more cheese and sauce. But I will give it a thumbs up for a first try!
Wednesday, July 27, 2011
A {sneak peek} of Sanibel
We took a short family vacation to Sanibel Island which continued to Coconut Point. All Natalie wanted to do was swim. Which consisted of floating under water and basically snorkeling, without the gear, on the first day. Which didn't do well on my nerves.
Here are a few shots from the trip...
Natalie's new favorite animal is a giraffe- so naturally we ate at The Blue Giraffe. |
Our Beach Babe |
Somewhere Over The Rainbow... |
She's a Growing Girl
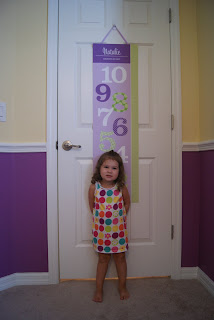
So Natalie is 2 1/2 and we have JUST hung up her growth chart...
Never too late- she'll never stop growing.
I found the chart through zulily (which deserves it's own posting). It's a company called petite lemon PRINTS and they have a wide range of fun things but are known for their decor, stationery and gifts. They have SUPER cute colors, fonts, characters, EVERYTHING. I could buy the whole store! They also personalize items which I was ALL for!The chart came in PERFECT form (rolled) which is the way it stayed for a LONG time while I figured out how to hang it without ruining it. In the meantime, I bought some cork board drawer liner and a removable hook. I have a plethora of ribbon (especially lavender) and sticky tac. Unrolled the chart in our garage and let the humidity do the work! :)
I then carefully attached the chart to the sticky side of the cork board- which was nerve racking! Hung it up on the wall and attached the ribbon to the hook...
Such a big girl! |
How big is Natalie? THIS BIG! |
LOVE THIS! |
So thank you Petite Lemon Prints for making such a great product that we'll treasure every inch of the way...
SUPER CHEESY- but I had to!
Monday, July 18, 2011
Sand Dollar Art
Here is another project that includes some of the things we have collected on our island trips. This one was my sister, Emily's idea. I love that I am surrounded by such amazingly creative people! So she collected an immense amount of sand dollars during her vacation here. Don't worry none of them were alive.
{And on a side note- if you desire sand dollars at any time go the the north end outside part of Anclote Key. We nicknamed it Sand Dollar Island on the 4th of July. Crazy amounts of sand dollars just lying around.}
We soaked them in a water/bleach solution- rinsed them REALLY good (Thanks Mom) and let them dry.
In the meantime- we purchased a white shadow box and some material that would match Natalie's bathroom- where this piece ended up.
She used hot glue to attach the sand dollars to the material.
And viola!
It fits in perfectly with the color scheme in her bathroom and I love that it's a piece COMPLETELY from her Aunt Emily! <3
Tuesday, July 5, 2011
A Beach Jewelry Holder
This past week we went on a night cruise to 3 Rooker and even though we had close encounters with both a type of sting ray :( AND dolphins :) I was able to find a untouched mussel shell in mint condition AND in one piece. I brought it back- soaked it, then bleached it in a 50/50 solution. I had to repair it a little at the hinge which I did with hot glue. It didn't want to lay flat so I attached a washer on the bottom and a little piece of felt so it wouldn't scratch my dresser. Finally- I put a layer of baby oil on it- which made it shine! A beach jewelry holder...
Love. |
I don't know if I've posted this or not. When we were at the sandbar north of Anclote last summer- I started collecting shells with Nat and placed them in the shape on an /S/. Uploaded the picture to CVS and inserted it into their Easel Art piece.
Love more! |
These shells are in a pretty pink basket in Nat's bathroom- a cute, easy and cheap way of decorating!
Saturday, July 2, 2011
Summer Fruit Ice Pops
I have seen this EVERYWHERE online now that summer has begun. So I decided to make some with Natalie. I bought a set of ice pops at Bed, Bath & Beyond. I started by cutting up peaches and watermelon into small chunks. I placed the peaches in 2 pops and the watermelon in the remaining 2 pops then filled all four with white grape juice. I threw them in the freezer for 24 hours and VOILA!
Side view |
So proud! |
YUMMY! |
Natalie's play area is under construction...
My summer project is to make Natalie's play area downstairs even cuter.
I have gotten some great ideas from blogs all over the place. The most inspiring one would be Modern Parents Messy Kids. It's SUPER simple and all from IKEA. I went the other day and got the magnetic board and spice containers but am waiting to put it up.
The reason is we are going to add this piece to the area so we need to wait to see if things shift. Seems Natalie's toys are oozing everywhere!
I'm not a painter so I need to add stuff to the wall that's easy- insert vinyl wall art! LOVE THIS STUFF! I found a super cute vinyl tree at Baby Gift Station.
Then we have my PLAY project. This was actually inspired from the show Cougartown. Jules has a fun fabric covered EAT in her kitchen. I bought the letters and fabric from Joann's.
So those are the updates so far. Hopefully by the end of the month we'll be done!
![]() |
Before |
The reason is we are going to add this piece to the area so we need to wait to see if things shift. Seems Natalie's toys are oozing everywhere!
I'm not a painter so I need to add stuff to the wall that's easy- insert vinyl wall art! LOVE THIS STUFF! I found a super cute vinyl tree at Baby Gift Station.
Reading to her friends |
First I painted the letters so the lighter fabrics wouldn't show the cardboard. |
The I put the letters face down and traced them on the fabric. I made sure the leave enough space around it. |
I put some cotton filler... |
A little will go a long way |
Cut the letters out of the fabric and wrapped them around the cardboard letters with a staple gun. There was a lot of cutting and stapling. |
![]() |
I then covered the sides with folded material. |
Just so Natalie remembers what to do in this area! |
:) |
Subscribe to:
Posts (Atom)