Showing posts with label kids. Show all posts

Friday, April 15, 2011

Easter Egg Decor

I love when I go to parties and the kids have made the decorations.  A couple years ago- I had my niece help me do the name cards for our Thanksgiving table.  I traced her hand and turned them into turkeys.  They were SUPER cute and everyone loved them.
Here is an adjustment on this project which I love but my husband convinced me not to go empty Lowe's and Home Depot's paint department in fear I might be placed on "THE LIST"...
After putting the Easter garland together I realized this could be easily done with many of the major holidays- you would obviously have to change the color scheme.

This is what you will need:
- Water colors (one with lighter colors)
- Paint brushes
- Cup of water
- White crayon
- Egg tracer (I used this one)
- Pencil
- Scissors
- Small hole punch
- Ribbon or yarn

I first drew a line down the middle a 26 x 3 1/2 piece of paper using a white crayon.  This helps the colors stay separate (crayon resist).
My garland has only 2 colors- the kids will have a variety of colors.
The kids chose 2 colors- one for the top and one for the bottom.
I let them dry and then cut them into 2 1/2 strips (which fits the egg tracer nicely).  I got 9 eggs out of each strip.
I then traced the egg on one paper, layer the rest underneath alternating the colors (flipping the paper), stapled them and cut them out.
I put 2 hole punches in each egg and strung them onto the yarn.
SUPER CUTE, SUPER EASY, and the kids LOVED it!

For My Little Artist

While searching for something for work, I came across this project.  Toddler Crayons!  My husband and I kept thinking Natalie needed a chunkier crayon to color with but the ones out there look like they would crumble or they weren't worth the price.  So I made these.  Super easy!  The part that took the most time was unwrapping the crayons and breaking them.  I would say I used 4 boxes of crayons.  Put them in cupcake/muffin tins or if you have shaped tins- that would be even cuter!  I've also seen them done with different colors.  My green turned out a little marbled- which I like.  Set the oven to 325 and put them in for about 12 minutes.  Check to make sure that all the crayons have melted and VOILA!

*My friend has also made these using the shaped tins...


Trick or Treating for Adults

I always love using Natalie in my crafts- especially the ones I give away.  So around her first Halloween I got the idea to give out candy to my girls at work...

Halloween Candy Tags
I've done these the past 2 years.  The first year, I did footprint art.  I put white paint on her foot and stamped it on black paper- I them colored it to look like candy corn.  I added this to a small bag of candy corn.  This picture was taken before I colored it.


This past year I did palm print pumpkins.  I put orange paint on her palm only and stamped it on white paper.  Cut it out, add a stem (brown paper bag) and a leaf (small green button).  I added this to a small bag of candy corn.


Thursday, April 14, 2011

End of the Year Crafts

Here are a few crafts I have done for my Room Moms and my students for the end of the year.  I have a STAR theme in my classroom so I love stars- and this brick was so cool to make.

Family Brick
I did this last year for my Room Mom's family.  I used one of my Ed Emberley books for the art.  The kids loved doing it!  It can be used as a door holder for those nice breezy days!


You're A Star!
I made this for my students at the end of the year.  They picked that paint, I painted and monogrammed them.  This can easily be a birthday favor or a rainy day activity.


Sending Japan Some Hope

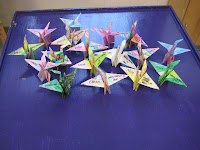
I came across OshKosh B'Gosh's Cranes for Kids: Giving Hope to the Children of Japan program and I couldn't help but get involved.  Here's the dish: 
Go to OshKosh B'Gosh and download the directions to make your very own crane.  When you have finished making it you can send it to OshKosh or drop it off at a store near you. 
OshGosh will donate a piece of clothing for every crane they get by April 25!
So get folding and send some hope to Japan.
* My Kindergarten students "helped" me do these.  They colored and decorated the 8x8 piece of paper I gave them and did the first 4 folds then I finished it up for them.  They loved watching it turn into a crane. 

My plain one...
COLOR!